Users have reported that skype audio stopped working after upgrading to Windows 10, and in most cases, it means that the drivers are not compatible with the new Windows.
Fix Skype Audio Not Working Windows 10
Method 1: Configure your speakers and microphone
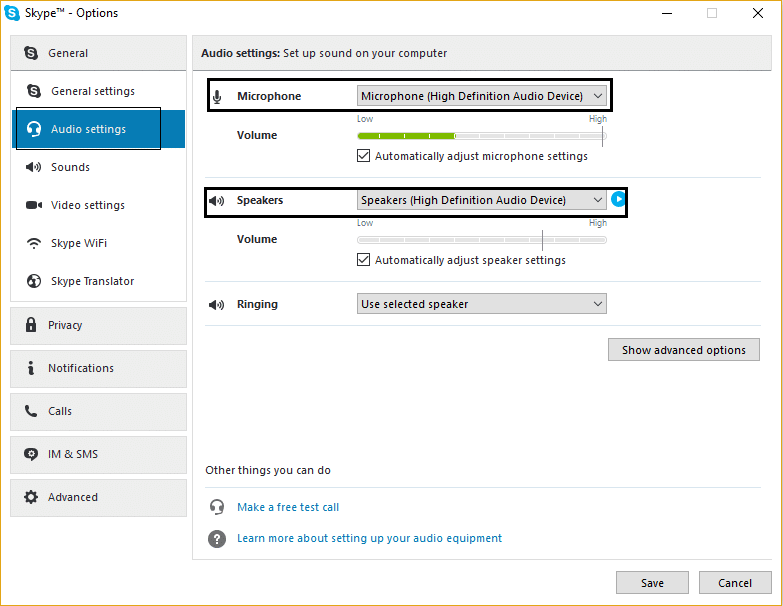
- Open Skype and go to tools, then click options.
Fix Skype Audio Not Working Windows 10 Method 1: Configure your speakers and microphone Method 2: Update Audio Drivers Method 3: Restart Windows Audio Services. Method 4: Change Windows Microphone Settings Method 5: Update Skype
Next, click Audio settings.
Make sure the Microphone is set to Internal MIC and speakers are set to Headphones and Speakers.
Also, “Automatically adjust microphone settings” is checked.
Click Save Changes and restart your PC.
Method 2: Update Audio Drivers
Press Windows Key + R, then type “devmgmt.msc” and hit enter to open device manager.
Next, click on Sound, video, and game controllers to expand it.
Now right-click on all the audio device present and select “Update driver software.”
Reboot to apply changes.
Method 3: Restart Windows Audio Services.
Sometimes the most simple fix for this problem is restarting Windows Audio Services, which can be done by following this link. If there is a problem with the sound/audio of your Windows 10, then read: How to fix Headphones not working in Windows 10
Method 4: Change Windows Microphone Settings
Right-click the Sound/Audio icon on your taskbar and select “Recording devices.”
Select your microphone, then right-click on it and select Properties.
Under properties, navigate to Advanced tab and make sure that “Allow applications to take exclusive control of this device is not enabled” is unchecked.
Click Apply and OK.
Reboot your PC to apply changes.
Method 5: Update Skype
Sometimes reinstalling or updating your skype to the latest version seems to fix the problem. That’s it; you have successfully Fix Skype Audio Not Working Windows 10, but if you still have any queries regarding this post, feel free to ask them in the comment section.


