How to Fix DISM Host Servicing Process High CPU Usage Issue
What is DISM Host Servicing Process?
Despite the various advantages of the DISM host servicing process, there are many conflicts associated with DismHost.exe as well. Many users claim that it is an essential component of the Windows Operating system. However, some people do not agree with this claim as you cannot see its icon on the Taskbar. On the other hand, some antivirus applications consider it malware. Hence, the DISM host servicing process leads to various issues like:
How to Fix DISM Host Servicing Process High CPU Usage Issue What is DISM Host Servicing Process? Method 1: Restart Your PC Method 2: Disable SuperFetch (SysMain) Method 3: Disable Background Intelligent Transfer Service Method 4: Disable Windows Search Service Method 5: Run Malware or Virus Scan Method 6: Update/Reinstall Drivers Method 7: Update Windows Method 8: Reinstall DismHost.exe Method 9: Perform System Restore
High CPU usage up to 90 to 100% Malware threat High bandwidth consumption
Read more about DISM here from the Microsoft website. Read and implement the given solutions to fix DISM Host Servicing Process causing the High CPU Usage issue on Windows 10.
Method 1: Restart Your PC
Before trying out the rest of the methods, you are advised to reboot your system. In most cases, a simple restart fixes the issue, without much effort.
- Press the Windows key and select the Power icon Note: Power icon is found at the bottom in Windows 10 system, while in Windows 8 system, it is located at the top.
- Several options like Sleep, Shut down, and Restart will be displayed. Here, click on Restart, as shown.
Restarting your system will refresh RAM and will lower CPU consumption.
Method 2: Disable SuperFetch (SysMain)
The startup time for applications and Windows is improved by a built-in feature called SysMain (formerly, SuperFetch). However, system programs do not benefit much from it. Instead, background activity is increased, leading to a reduction in the operational speed of the computer. These Windows services consume a lot of CPU resources, and hence, it is often, recommended to disable SuperFetch in your system.
Launch the Run dialog box by holding Windows + R keys together.
Type services.msc as shown and click OK to launch the Services window.
Now, scroll down and right-click on SysMain. Then, select Properties, as depicted.
Here, in the General tab, set the Startup type to Disabled from the drop-down menu, as highlighted below.
Finally, click Apply and then, OK to save the changes. Also Read: Fix DISM Error 14098 Component Store has been corrupted
Method 3: Disable Background Intelligent Transfer Service
Similarly, disabling BITS will help fix DISM host servicing process high CPU usage error.
Navigate to the Services window using the steps mentioned in Method 2.
Scroll and right-click on Background Intelligent Transfer Service and select Properties.
Here, in the General tab, set the Startup type to Disabled, as depicted.
Finally, click Apply then, OK to save the changes.
Method 4: Disable Windows Search Service
Likewise, this process too takes up a lot of CPU resources and can be easily disabled to fix said problem, as explained below.
Again, launch the Services Window as mentioned in the above Method 2.
Now, right-click on Windows Search Service, and select Properties, as shown.
Here, in the General tab, set the Startup type to Disabled, as highlighted.
Click on Apply > OK and exit. Also Read: Fix DISM Source Files Could not be Found Error
Method 5: Run Malware or Virus Scan
Windows Defender may not recognize the threat when a virus or malware uses the DismHost.exe file as camouflage. Thereby, hackers may easily intrude into your system. Few malicious software such as worms, bugs, bots, adware, etc. might also contribute to this problem. However, you can identify if your system is under malicious threat through the unusual behavior of your Operating System.
You will notice several unauthorized access. Your system will crash more frequently.
Few anti-malware programs can help you overcome malicious software. They routinely scan and safeguard your system. Therefore, to avoid DISM host servicing process high CPU usage error, run an antivirus scan in your system and check if the problem is solved. Follow the below-mentioned steps to do so:
Navigate to Windows Settings by pressing Windows + I keys together.
Here, click on Update & Security, as shown.
Click on Windows Security in the left pane.
Next, select the Virus & threat protection option under Protection areas, as depicted.
5A. Click on Start Actions under Current threats to take action against the listed threats.
5B. If you do not have any threats in your system, the system will display No actions needed alert.
- Reboot your system and check if DISM high CPU usage error is fixed.
Method 6: Update/Reinstall Drivers
If the new drivers you have installed or updated in your system are incompatible or outdated in relevance to the operating system files, you will face the DISM host servicing process high CPU usage problem. Therefore, you are advised to update your device and drivers to prevent the said problem.
Launch Device Manager from the Windows 10 search as shown.
Double-click on System devices to expand it.
Now, right-click on your system driver and click on Update driver, as highlighted.
Click on Search automatically for drivers to let Windows locate and install the driver.
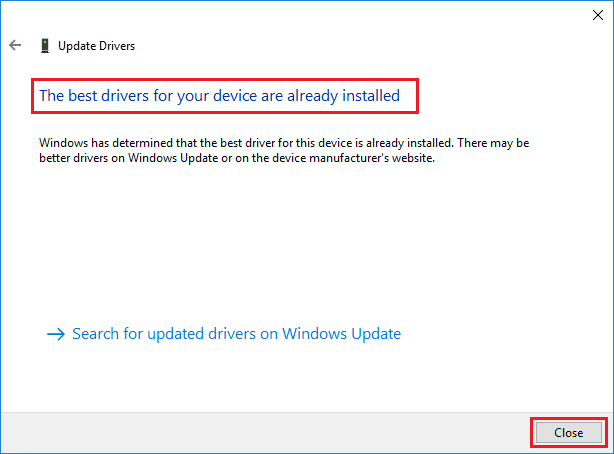
5A. Now, the drivers will update to the latest version, if they are not updated. 5B. If they are already in an updated stage, the screen displays: Windows has determined that the best driver for this device is already installed. There may be better drivers on Windows Update or on the device manufacturer’s website. Click on the Close button to exit the window.
Restart the computer, and confirm that the high CPU usage issue is fixed. In some cases, users could fix high CPU usage issue by reinstalling the drivers that were causing the said issue like Display or Audio or Network drivers.
Launch Device Manager and expand any section by double-clicking on it.
Now, right-click on the driver, e.g. Intel Display Adapter, and select Uninstall device, as shown.
Check the box titled Delete the driver software for this device and confirm the prompt by clicking Uninstall.
Now, visit the manufacture’s website and download the latest version of the said driver. Note: You can download Intel, AMD, or NVIDIA display drivers from here.
Then, follow the on-screen instructions to run the executable and install the driver. Note: When installing a new driver on your device, your system may reboot several times. Also read: What is Device Manager? [EXPLAINED]
Method 7: Update Windows
If you did not obtain fix by the above methods, then installing the latest version of Windows should solve the DISM host servicing process high CPU usage issue.
- Navigate to Settings > Update & Security as instructed in Method 5.
- Now, select Check for Updates from the right panel.
3A. Follow the on-screen instructions to download and install the latest update, if available.
3B. If your system is already up-to-date, then it will show You’re up to date message.
- Restart your PC to complete the installation.
Method 8: Reinstall DismHost.exe
Sometimes reinstalling DismHost.exe file can fix the DISM host servicing process high CPU usage issue.
Launch Control Panel through the Search Bar as shown below.
Set View by > Category and click on Uninstall a program, as depicted below.
Here, search for DismHost.exe and click on it. Then, select Uninstall. Note: Here, we have used Google Chrome as an example.
Now, confirm the prompt by clicking on Uninstall.
In the Windows Search box, type %appdata% to open App Data Roaming folder.
Here, right-click on the DismHost.exe folder and click Delete. Note: We have used Chrome as an example here.
Reinstall DismHost.exe from here and follow the on-screen instructions. Also Read: Fix DISM Error 0x800f081f in Windows 10
Method 9: Perform System Restore
If you are still facing high CPU usage issue, then the last resort is to perform a system restore. Follow the steps below to do the same:
Launch Control Panel as mentioned above.
Set View by > Large icons and click on Recovery, as shown.
Click on Open System Restore option.
Now, click on Next.
Select the last update and click on Next, as shown highlighted below.
Finally, click on Finish to restore your Windows PC to the state where DISM Servicing Process wasn’t causing any issues. Recommended:
Fix DISM Error 87 in Windows 10 How to Fix Git Merge Error Fix Device Not Migrated Error on Windows 10 Fix There Are Currently No Power Options Available
We hope that this guide was helpful and you could fix DISM host servicing process high CPU usage issue. Let us know which method worked for you. Also, if you have any queries or suggestions, then feel free to drop them in the comment section.